# Microsoft Windows 10/11

Auto-generated by TheOpenRoad Support.

# Flush or clear the DNS Resolver cache in Windows 10 and 11

In Windows 10 and 11, you may flush or clear the DNS Resolver cache to remove old or bad cache stored on your computer. This means completely removing all the information stored within the cache, and can help troubleshoot website connectivity issues.

#### Flush the DNS cache in Windows Command Prompt:

**1.** Press the **Windows Key** + **R** on your keyboard, this will open *Run* in Windows.

[![image.png](https://foundry.theopenroad.cloud/uploads/images/gallery/2026-10/scaled-1680-/pw6ItAYzB8LVGujb-image.png)](https://foundry.theopenroad.cloud/uploads/images/gallery/2026-10/pw6ItAYzB8LVGujb-image.png)

**2.** As shown in the image above, type `<span class="editor-theme-code">cmd</span>` into the textbox and press **Enter** on your keyboard.

[![image.png](https://foundry.theopenroad.cloud/uploads/images/gallery/2026-10/scaled-1680-/wuZ2vTlgaKXco21r-image.png)](https://foundry.theopenroad.cloud/uploads/images/gallery/2026-10/wuZ2vTlgaKXco21r-image.png)

**3.** Type `<span class="editor-theme-code">ipconfig /flushdns</span>` into Windows Command Prompt, and press **Enter**.

**4**. If the command above has been executed successfully with the appropriate permissions, you will receive a success response in the command terminal. The DNS Resolver cache has now been cleared.

**5.** To exit Windows Command Prompt, type `<span class="editor-theme-code">exit</span>` or click the **Red X** at the top right corner of the window.

<details id="bkmrk-about-this-articlewr"><summary>About this article</summary>

- Written by [Gary Phatt](https://foundry.theopenroad.cloud/user/gary-phatt), a TheOpenRoad Support employee.
- Still need help? Please write to us in the comment section below or [contact TheOpenRoad support](https://theopenro.ad/inquire).

---

![image.png](https://foundry.theopenroad.cloud/uploads/images/gallery/2026-10/scaled-1680-/Pb3qkbU7oacVfqRn-image.png)

#### **Please rate your experience with this article today:**

When you select a number, *1 being the lowest and 9 being the highest*; the page will refresh and your feedback will be submitted to TheOpenRoad.

## [**1**](https://foundry.theopenroad.cloud/books/microsoft-windows-1011/page/flush-or-clear-the-dns-resolver-cache-in-windows-10-and-11) [**2**](https://foundry.theopenroad.cloud/books/microsoft-windows-1011/page/flush-or-clear-the-dns-resolver-cache-in-windows-10-and-11) [**3**](https://foundry.theopenroad.cloud/books/microsoft-windows-1011/page/flush-or-clear-the-dns-resolver-cache-in-windows-10-and-11) [**4**](https://foundry.theopenroad.cloud/books/microsoft-windows-1011/page/flush-or-clear-the-dns-resolver-cache-in-windows-10-and-11) [**5**](https://foundry.theopenroad.cloud/books/microsoft-windows-1011/page/flush-or-clear-the-dns-resolver-cache-in-windows-10-and-11) [**6**](https://foundry.theopenroad.cloud/books/microsoft-windows-1011/page/flush-or-clear-the-dns-resolver-cache-in-windows-10-and-11) [**7**](https://foundry.theopenroad.cloud/books/microsoft-windows-1011/page/flush-or-clear-the-dns-resolver-cache-in-windows-10-and-11) [**8**](https://foundry.theopenroad.cloud/books/microsoft-windows-1011/page/flush-or-clear-the-dns-resolver-cache-in-windows-10-and-11) [**9**](https://foundry.theopenroad.cloud/books/microsoft-windows-1011/page/flush-or-clear-the-dns-resolver-cache-in-windows-10-and-11)

</details>

# Install Python in Windows 10 and 11

Python is a highly popular and free general purpose programming language, if you want to start programming in Python on your Windows computer, you'll need to download and install a specific version of Python.

#### Install Python 3:

**1.** Navigate to [https://www.python.org/downloads](https://www.python.org/downloads) in your chosen web browser (Chrome, Firefox, Edge, etc.)

[![image.png](https://foundry.theopenroad.cloud/uploads/images/gallery/2026-10/scaled-1680-/hQePuncWBDIMvb5Q-image.png)](https://foundry.theopenroad.cloud/uploads/images/gallery/2026-10/hQePuncWBDIMvb5Q-image.png)

**2.** The most recent version of Python will always appear on the **Download** button near the top of the page.

<p class="callout info">Python now includes a "Python install manager" as the download button on the downloads page, this can make upgrading versions easier; but in the event you just want to install one specific version, you can click on the **Standalone Installer** link just below. If you are still having trouble downloading the standalone installer, try [this link](https://www.python.org/ftp/python/3.14.8/python-3.14.8-amd64.exe) to install Python 3.14.8.</p>

**3.** Once the installer completes, you may run the installer to install Python on your computer.

**4.** During setup, check the box next to *Add Python &lt;version&gt; to PATH.* It's at the bottom of the window. In case you don't see it, you can proceed with the next step anyway.

**5.** Click **Customize Installation,** it is the second blue link on the installer window.

**6.** Review the installation settings, and click **Next**. Python's required features are selected by default; Unless you have a specific need to skip installing select packages, you can leave these selections alone.

**7.** You can review the **Advanced Options** pages to make any changes in your favor, if you are a System Administrator; you can select Python to install for all users on the computer by selecting the checkbox. Click **Install** after you are done making your changes.

**8.** You may receive a message from *User Account Control* confirming the installation of Python, click on **Yes** to confirm. If it asks you for credentials you do not have, you may not have the required privileges to install Python. *Contact your system administrator to resolve this issue.*

**9.** You should then be shown an *Installation Successful* screen after installation completes, click on the **Disable path length limit** blue link. This final setting ensures that Python, and other applications can use paths more than 260 characters in length.

**10.** You may be prompted again by User Account Control for Administrator confirmation, after granting permission; you shall be shown another success popup, and can click **Close** to exit the installer once complete.

#### Testing Python 3:

Once Python 3 has been successfully installed on your system, you can run the following commands shown in order to verify that Python has been installed successfully and is working correctly on your computer.

**1.** Press the **Windows Key** + **R** on your keyboard, this will open *Run* in Windows.

[![image.png](https://foundry.theopenroad.cloud/uploads/images/gallery/2026-10/scaled-1680-/yeEopMgB1CqRUS0j-image.png)](https://foundry.theopenroad.cloud/uploads/images/gallery/2026-10/yeEopMgB1CqRUS0j-image.png)
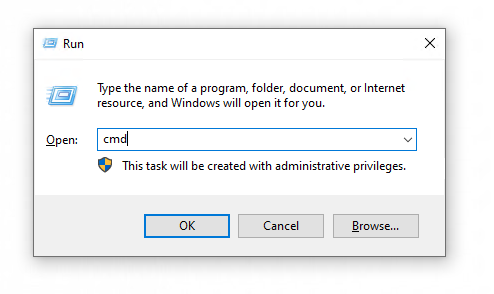
**2.** As shown in the image above, type `<span class="editor-theme-code">cmd</span>` into the textbox and press **Enter** on your keyboard. This will open *Windows Command Prompt* onto your desktop.

[![image.png](https://foundry.theopenroad.cloud/uploads/images/gallery/2026-10/scaled-1680-/XWAnHNKHrU66ej9F-image.png)](https://foundry.theopenroad.cloud/uploads/images/gallery/2026-10/XWAnHNKHrU66ej9F-image.png)
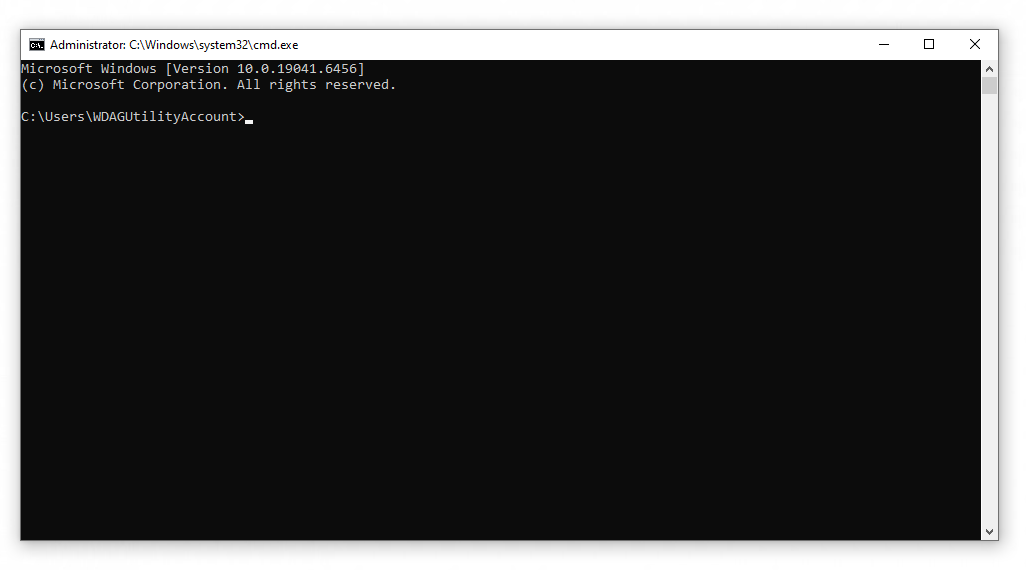
**3.** You can run the following commands below to run in *Windows Command Prompt*:

- Type `<span class="editor-theme-code">python</span>` into the terminal window and press **Enter** on your keyboard, you should then see `<span class="editor-theme-code">>>></span>` appear, this means Python is working and the path is set correctly.
- Type `<span class="editor-theme-code">exit()</span>` to return back to *Windows Command Prompt*.

**4.** If the commands above work correctly on your computer, Python has successfully been installed and is now ready for use.

<details id="bkmrk-about-this-articlewr"><summary>About this article</summary>

- Written by [Gary Phatt](https://foundry.theopenroad.cloud/user/gary-phatt), a TheOpenRoad Support employee.
- Still need help? Please write to us in the comment section below or [contact TheOpenRoad support](https://theopenro.ad/inquire).

---

![image.png](https://foundry.theopenroad.cloud/uploads/images/gallery/2026-10/scaled-1680-/Pb3qkbU7oacVfqRn-image.png)

#### **Please rate your experience with this article today:**

When you select a number, *1 being the lowest and 9 being the highest*; the page will refresh and your feedback will be submitted to TheOpenRoad.

## [**1**](https://foundry.theopenroad.cloud/books/microsoft-windows-1011/page/install-python-in-windows-10-and-11) [**2**](https://foundry.theopenroad.cloud/books/microsoft-windows-1011/page/install-python-in-windows-10-and-11) [**3**](https://foundry.theopenroad.cloud/books/microsoft-windows-1011/page/install-python-in-windows-10-and-11) [**4**](https://foundry.theopenroad.cloud/books/microsoft-windows-1011/page/install-python-in-windows-10-and-11) [**5**](https://foundry.theopenroad.cloud/books/microsoft-windows-1011/page/install-python-in-windows-10-and-11) [**6**](https://foundry.theopenroad.cloud/books/microsoft-windows-1011/page/install-python-in-windows-10-and-11) [**7**](https://foundry.theopenroad.cloud/books/microsoft-windows-1011/page/install-python-in-windows-10-and-11) [**8**](https://foundry.theopenroad.cloud/books/microsoft-windows-1011/page/install-python-in-windows-10-and-11) [**9**](https://foundry.theopenroad.cloud/books/microsoft-windows-1011/page/install-python-in-windows-10-and-11)

</details>

# Download/Install Epson Receipt Printer Drivers in Windows 10 and 11

Epson provides multiple models of thermal receipt printers, including the TM-T20II and TM-T20III models. This article will guide you through the process of downloading and installing Epson printer drivers on your Windows computer.

Several TheOpenRoad products utilize receipt printing in workflows, if you are a TheOpenRoad Employee configuring receipt printing for internal applications; refer to the specific guide provided by your department I.T Administrator.

#### Downloading the Epson printer drivers

**1.** Navigate to the official [Epson Driver Download Center](https://epson.com/Support/Point-of-Sale/Thermal-Printers/sh/s530) in your web browser of choice.

**2.** Choose your Epson receipt printer model, this can be found on the sticker beneath the printer and begins with **TM-**.

**3.** You will be redirected to the product page of your chosen model, scroll down to the **Operating System** dropdown and select **Windows 10 64-bit** or **Windows 11**.

[![image.png](https://foundry.theopenroad.cloud/uploads/images/gallery/2026-10/scaled-1680-/Wjqz5UW03zpEXqNT-image.png)](https://foundry.theopenroad.cloud/uploads/images/gallery/2026-10/Wjqz5UW03zpEXqNT-image.png)

**4.** Click **GO** beside the dropdown, you will then be redirected to a list of driver files available for download.

**5.** Scroll down until you see the **Drivers** link, click to expand it. You will then see the complete list of downloadable files.

**6.** In order to print to your Epson receipt printer via USB, you must download the appropriate USB driver, select the **TMUSB Device Driver v800d** download link from the list below. An application file will be downloaded.

#### Installing the Epson printer drivers

**1.** Locate the application file in the Downloads folder of your computer in File Explorer, or drag the downloaded file from your browser to your desktop and double-click the file to open it; you should then see Windows File Explorer open the file and display its contents.

[![image.png](https://foundry.theopenroad.cloud/uploads/images/gallery/2026-10/scaled-1680-/hU0rQNRU0KlPu8X4-image.png)](https://foundry.theopenroad.cloud/uploads/images/gallery/2026-10/hU0rQNRU0KlPu8X4-image.png)

**2.** Double-click the highlighted file in blue as seen in the image above to open it, you should then see the ***Epson Driver Installation Wizard*** launch, press the Next button in the bottom right corner to proceed.

**3.** You will then be prompted by Epson to accept their SLA, (Service License Agreement) select: **I accept this SLA,** and then click **Next** if you agree and would like to continue the installation.

**4.** The Epson installation wizard will take a few moments to download &amp; install the files onto your computer, when this is successfully completed; you will be prompted with the following success prompt.

[![image.png](https://foundry.theopenroad.cloud/uploads/images/gallery/2026-10/scaled-1680-/SYHDogIesuZmIPib-image.png)](https://foundry.theopenroad.cloud/uploads/images/gallery/2026-10/SYHDogIesuZmIPib-image.png)

**5.** Click **Finish** to confirm the success dialogue and return to your computer, the installation for this driver is now complete.

**6.** Repeat the same steps to install the **EPSON Advanced Printer Driver 6**, and any drivers that shall be downloaded and installed on your computer in the future.

**7.** Once all required drivers are downloaded and installed on your computer successfully, your Epson receipt printer should now work with your computer as intended; which indicates the printer has been configured for your computer successfully.

#### Helpful resources

- [YouTube.com - Installing the Drivers &amp; Connecting the Epson TM-T88V to a Windows PC](https://www.youtube.com/watch?v=RfybSyKKAt4)

<iframe height="315" src="https://www.youtube-nocookie.com/embed/RfybSyKKAt4?si=YiyuI8G6x4Q3WaVE" title="YouTube video player" width="560"></iframe>

<details id="bkmrk-about-this-articlewr"><summary>About this article</summary>

- Written by [Marv Eaton](https://foundry.theopenroad.cloud/user/marv-eaton), a TheOpenRoad Support employee.
- Still need help? Please write to us in the comment section below or [contact TheOpenRoad support](https://theopenro.ad/inquire).

---

![image.png](https://foundry.theopenroad.cloud/uploads/images/gallery/2026-10/scaled-1680-/Pb3qkbU7oacVfqRn-image.png)

#### **Please rate your experience with this article today:**

When you select a number, *1 being the lowest and 9 being the highest*; the page will refresh and your feedback will be submitted to TheOpenRoad.

## [**1**](https://foundry.theopenroad.cloud/books/microsoft-windows-1011/page/downloadinstall-epson-receipt-printer-drivers-in-windows-10-and-11) [**2**](https://foundry.theopenroad.cloud/books/microsoft-windows-1011/page/downloadinstall-epson-receipt-printer-drivers-in-windows-10-and-11) [**3**](https://foundry.theopenroad.cloud/books/microsoft-windows-1011/page/downloadinstall-epson-receipt-printer-drivers-in-windows-10-and-11) [**4**](https://foundry.theopenroad.cloud/books/microsoft-windows-1011/page/downloadinstall-epson-receipt-printer-drivers-in-windows-10-and-11) [**5**](https://foundry.theopenroad.cloud/books/microsoft-windows-1011/page/downloadinstall-epson-receipt-printer-drivers-in-windows-10-and-11) [**6**](https://foundry.theopenroad.cloud/books/microsoft-windows-1011/page/downloadinstall-epson-receipt-printer-drivers-in-windows-10-and-11) [**7**](https://foundry.theopenroad.cloud/books/microsoft-windows-1011/page/downloadinstall-epson-receipt-printer-drivers-in-windows-10-and-11) [**8**](https://foundry.theopenroad.cloud/books/microsoft-windows-1011/page/downloadinstall-epson-receipt-printer-drivers-in-windows-10-and-11) [**9**](https://foundry.theopenroad.cloud/books/microsoft-windows-1011/page/downloadinstall-epson-receipt-printer-drivers-in-windows-10-and-11)

</details>

# User Account Control (UAC) in Windows 10 and 11

##### Introduction to User Account Control (UAC)

**User Account Control (UAC)** is a security feature in Microsoft Windows 10 and Windows 11 that helps prevent unauthorized changes to the operating system. It is designed to protect computers from potentially harmful applications, malicious software, and unintended administrative actions.

UAC works by notifying users whenever an application or process attempts to perform an operation that requires administrative privileges. Depending on the system configuration and the type of operation, Windows may display a confirmation prompt asking the user to approve or deny the action.

The primary purpose of UAC is to ensure that applications do not automatically receive elevated administrative permissions simply because a user is logged on with an administrator account.

UAC is an important component of the Windows security architecture and supports the principle of least privilege, which means that users and applications should operate with only the permissions necessary to perform their tasks.

##### Benefits and purpose

UAC was introduced to reduce the risks associated with running Windows applications with unrestricted administrative privileges.

Its main objectives include:

- Prevent unauthorized system changes: Require approval before applications perform certain administrative operations.
- Reduce malware impact: Help prevent malicious applications from silently modifying protected system resources.
- Protect system configuration: Restrict unauthorized changes to Windows settings, system files, and registry locations.
- Promote least-privilege operation: Allow users to perform everyday activities without continuously operating with elevated permissions.
- Improve user awareness: Inform users when an application requests administrative privileges.

UAC does not guarantee complete protection against malware. Instead, it provides an additional security layer that works alongside Microsoft Defender Antivirus, Windows Firewall, application control, and other Windows security mechanisms.

##### How UAC works

UAC uses a mechanism called *Admin Approval Mode* to control how administrative privileges are granted.

When a user signs in to Windows, the operating system determines the user's account type and creates the appropriate access tokens.

[![image.png](https://foundry.theopenroad.cloud/uploads/images/gallery/2026-10/scaled-1680-/2ujxS9xijVzcLiP4-image.png)](https://foundry.theopenroad.cloud/uploads/images/gallery/2026-10/2ujxS9xijVzcLiP4-image.png)

For standard users, applications normally run with standard user permissions.

For administrators operating with Admin Approval Mode enabled, Windows generally creates two access tokens:

1. **Standard user token:** Used for normal application execution and everyday activities.
2. **Elevated administrator token:** Contains administrative privileges and is used only when an operation requires elevation.

When an application attempts to perform an administrative operation, Windows checks whether elevation is required.

If elevation is required, Windows displays a UAC prompt. The user must provide the appropriate approval or administrator credentials before the process can continue.

[![image.png](https://foundry.theopenroad.cloud/uploads/images/gallery/2026-10/scaled-1680-/UGobmzp2R8IrupbP-image.png)](https://foundry.theopenroad.cloud/uploads/images/gallery/2026-10/UGobmzp2R8IrupbP-image.png)

The credential prompt is presented when a standard user attempts to perform a task that requires a user's administrative access token. Administrators can also be required to provide their credentials by setting the User Account Control: Behavior of the elevation prompt for administrators in Admin Approval Mode policy setting value to Prompt for credentials.

[![image.png](https://foundry.theopenroad.cloud/uploads/images/gallery/2026-10/scaled-1680-/67TYezAijiZTRZTP-image.png)](https://foundry.theopenroad.cloud/uploads/images/gallery/2026-10/67TYezAijiZTRZTP-image.png)

##### UAC Notification levels

Windows 10 and Windows 11 provide a graphical interface for configuring UAC notification behavior. The notification settings contain four levels.

<table id="bkmrk-leveldescriptionalwa"><colgroup><col style="width:240px;"></col><col style="width:581px;"></col></colgroup><tbody><tr><th>**Level**

</th><th>**Description**

</th></tr><tr><td>Always notify

</td><td>Windows notifies the user whenever applications attempt to install software or make changes to the computer, and when the user makes changes to Windows settings.

</td></tr><tr><td>Notify me only when apps try to make changes *(default)*

</td><td>Windows notifies the user when applications attempt to make changes but does not notify when the user makes changes to Windows settings.

</td></tr><tr><td>Notify me only when apps try to make changes *(do not dim my desktop)*

</td><td>Similar to the previous level, but the UAC prompt appears on the normal desktop instead of switching to the Secure Desktop.

</td></tr><tr><td>Never notify

</td><td>Windows does not display standard UAC notifications. This significantly reduces protection against unauthorized administrative changes.

</td></tr></tbody></table>

<details id="bkmrk-about-this-articlewr"><summary>About this article</summary>

- Written by [Gary Phatt](https://foundry.theopenroad.cloud/user/gary-phatt), a TheOpenRoad Support employee.
- Still need help? Please write to us in the comment section below or [contact TheOpenRoad support](https://theopenro.ad/inquire).

---

![image.png](https://foundry.theopenroad.cloud/uploads/images/gallery/2026-10/scaled-1680-/Pb3qkbU7oacVfqRn-image.png)

#### **Please rate your experience with this article today:**

When you select a number, *1 being the lowest and 9 being the highest*; the page will refresh and your feedback will be submitted to TheOpenRoad.

## [**1**](https://foundry.theopenroad.cloud/books/microsoft-windows-1011/page/user-account-control-uac-in-windows-10-and-11) [**2**](https://foundry.theopenroad.cloud/books/microsoft-windows-1011/page/user-account-control-uac-in-windows-10-and-11) [**3**](https://foundry.theopenroad.cloud/books/microsoft-windows-1011/page/user-account-control-uac-in-windows-10-and-11) [**4**](https://foundry.theopenroad.cloud/books/microsoft-windows-1011/page/user-account-control-uac-in-windows-10-and-11) [**5**](https://foundry.theopenroad.cloud/books/microsoft-windows-1011/page/user-account-control-uac-in-windows-10-and-11) [**6**](https://foundry.theopenroad.cloud/books/microsoft-windows-1011/page/user-account-control-uac-in-windows-10-and-11) [**7**](https://foundry.theopenroad.cloud/books/microsoft-windows-1011/page/user-account-control-uac-in-windows-10-and-11) [**8**](https://foundry.theopenroad.cloud/books/microsoft-windows-1011/page/user-account-control-uac-in-windows-10-and-11) [**9**](https://foundry.theopenroad.cloud/books/microsoft-windows-1011/page/user-account-control-uac-in-windows-10-and-11)

</details>

# Fix common issues with Wi-Fi in Windows 10 and 11

If you find yourself unable to connect to wireless internet (Wi-Fi) in Windows 10 and 11, you may experience connection issues when attempting to browse the web, steaming media, and access your email.

#### Please try running the Network Troubleshooter

In the Windows Settings app, you can start the automated Network troubleshooter application to detect possible problems as well as solutions to fix the issue. If you are using an older version of Windows or a mobile device, please skip to [General Troubleshooting](#bkmrk-general-troubleshoot "General Troubleshooting") steps.

##### Windows 11

- <a title="">Click here to launch and run the Network troubleshooter</a>

##### Windows 10

- Right-click on the **Windows Start** icon on the taskbar, select **Settings** from the menu
- Click on the **Network &amp; Internet** menu option on the left sidebar
- Scroll down and select the **Network troubleshooter** option
- A new window titled *Troubleshoot Problems* will then proceed to open. Follow the on-screen instructions to complete the process

#### Understanding Windows Wi-Fi Icons

Windows 10 and 11 both feature a range of icons which primarily display on the bottom right corner of the taskbar and in the Windows settings app. Not all icons featured for Windows 11 are supported in Windows 10.

<table id="bkmrk-icon-%28windows-11%29ico"><colgroup><col style="width:240px;"></col><col style="width:240px;"></col><col style="width:240px;"></col></colgroup><tbody><tr><th>**Icon (Windows 11)**

</th><th>**Icon (Windows 10)**

</th><th>**Meaning**

</th></tr><tr><td>[![image.png](https://foundry.theopenroad.cloud/uploads/images/gallery/2026-11/scaled-1680-/dW0zQTfgaLMHKQaw-image.png)](https://foundry.theopenroad.cloud/uploads/images/gallery/2026-11/dW0zQTfgaLMHKQaw-image.png)

</td><td>[![image.png](https://foundry.theopenroad.cloud/uploads/images/gallery/2026-11/scaled-1680-/XdKlQ4979J7vWJID-image.png)](https://foundry.theopenroad.cloud/uploads/images/gallery/2026-11/XdKlQ4979J7vWJID-image.png)

</td><td>**Wi-Fi Connected:** You’re connected to Wi-Fi and the Internet should be working. If you see this icon but you’re still having connectivity issues, the problem might be with a specific app or website or a firewall blocking your Internet connection.

</td></tr><tr style="height:10px;"><td>[![image.png](https://foundry.theopenroad.cloud/uploads/images/gallery/2026-11/scaled-1680-/0SRRqKHYF9Zw5vX0-image.png)](https://foundry.theopenroad.cloud/uploads/images/gallery/2026-11/0SRRqKHYF9Zw5vX0-image.png)

</td><td></td><td>**VPN or Proxy Connected:** You have an active Virtual Private Network or proxy connected.

</td></tr><tr><td>[![image.png](https://foundry.theopenroad.cloud/uploads/images/gallery/2026-11/scaled-1680-/doJITmpHgCSgHThP-image.png)](https://foundry.theopenroad.cloud/uploads/images/gallery/2026-11/doJITmpHgCSgHThP-image.png)

</td><td>[![image.png](https://foundry.theopenroad.cloud/uploads/images/gallery/2026-11/scaled-1680-/m8I9sfvQLBrEd5ql-image.png)](https://foundry.theopenroad.cloud/uploads/images/gallery/2026-11/m8I9sfvQLBrEd5ql-image.png)

</td><td>**Not connected, Offline:** Your device doesn't have an Internet connection. For Wi-Fi, this can appear for one or more reasons.

</td></tr></tbody></table>

#### General Troubleshooting

Please try the following general troubleshooting steps to help solve the Wi-Fi problem:

##### Check your network connection status

- Select the **Network**, **Sound**, or **Battery** icons![wifi.png](https://support.microsoft.com/en-us/windows/media/wifi.png) ![volume3.png](https://support.microsoft.com/en-us/windows/media/volume3.png) ![mobbatterycharging9.png](https://support.microsoft.com/en-us/windows/media/mobbatterycharging9.png)on the right side of the taskbar
- Make sure that Wi-Fi is turned on
- Check if your network name shows ***Connected*** below it. If it displays a status other than ***Connected***, select a Wi-Fi network you recognize from the list of available networks. Then, click on the network and attempt to connect

##### Check airplane mode is turned off

- Go to **Settings**, then **Network &amp; Internet**, then **Airplane mode**
- Ensure Airplane mode is **turned off**

##### Forget and reconnect to the Wi-Fi network

- Open the![settingsapp.png](https://support.microsoft.com/en-us/windows/media/settingsapp.png)[Settings app](https://support.microsoft.com/en-us/windows/experience/system-configuration-tools-in-windows#bkmk_settings) on your Windows device
- Select **Network &amp; internet**, then **Wi-Fi**, then select **Manage known networks**
- Select the Wi-Fi network you would like to connect to, and click **Forget**
- Reconnect to the network by selecting it and entering the password

#### Conclusion

If you have followed all the steps above, and you are still unable to get connected to wireless Wi-Fi, please consider [contacting Microsoft Support](https://support.microsoft.com/en-us/), or your network administrator, or internet service provider (ISP) to resolve connection issues with your Windows device. If you are a network administrator, we advise you to follow the external documentation resources linked below.

#### Helpful resources

- [Microsoft Support: Fix Wi-Fi connection issues in Windows | Microsoft Windows Support](https://support.microsoft.com/en-us/windows/experience/connectivity-networking/fix-wi-fi-connection-issues-in-windows#bkmk_general_troubleshooting)
- [Contact Microsoft Support: Microsoft Support](https://support.microsoft.com/en-us/)

<details id="bkmrk-about-this-articlewr"><summary>About this article</summary>

- Written by [Gary Phatt](https://foundry.theopenroad.cloud/user/gary-phatt), a TheOpenRoad Support employee.
- Still need help? Please write to us in the comment section below or [contact TheOpenRoad support](https://theopenro.ad/inquire).

---

![image.png](https://foundry.theopenroad.cloud/uploads/images/gallery/2026-10/scaled-1680-/Pb3qkbU7oacVfqRn-image.png)

#### **Please rate your experience with this article today:**

When you select a number, *1 being the lowest and 9 being the highest*; the page will refresh and your feedback will be submitted to TheOpenRoad.

## [**1**](https://foundry.theopenroad.cloud/books/microsoft-windows-1011/page/fix-common-issues-with-wi-fi-in-windows-10-and-11) [**2**](https://foundry.theopenroad.cloud/books/microsoft-windows-1011/page/fix-common-issues-with-wi-fi-in-windows-10-and-11) [**3**](https://foundry.theopenroad.cloud/books/microsoft-windows-1011/page/fix-common-issues-with-wi-fi-in-windows-10-and-11) [**4**](https://foundry.theopenroad.cloud/books/microsoft-windows-1011/page/fix-common-issues-with-wi-fi-in-windows-10-and-11) [**5**](https://foundry.theopenroad.cloud/books/microsoft-windows-1011/page/fix-common-issues-with-wi-fi-in-windows-10-and-11) [**6**](https://foundry.theopenroad.cloud/books/microsoft-windows-1011/page/fix-common-issues-with-wi-fi-in-windows-10-and-11) [**7**](https://foundry.theopenroad.cloud/books/microsoft-windows-1011/page/fix-common-issues-with-wi-fi-in-windows-10-and-11) [**8**](https://foundry.theopenroad.cloud/books/microsoft-windows-1011/page/fix-common-issues-with-wi-fi-in-windows-10-and-11) [**9**](https://foundry.theopenroad.cloud/books/microsoft-windows-1011/page/fix-common-issues-with-wi-fi-in-windows-10-and-11)

</details>